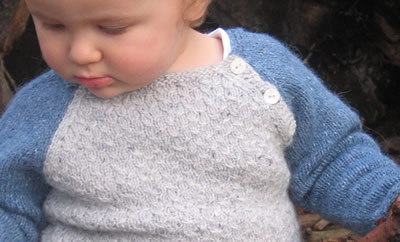
Cirrus Sweater

I wanted to knit a casual but technically interesting jumper for my son – a smart version of a baseball tee shirt. The texture of the body reminds me of wisps of clouds.
SIZE
Newborn [3-6 months, 6-9 months, 9-12 month, 12-18 months, 18-24 months, 3T]
Shown in 12-18 months
FINISHED MEASUREMENTS
Chest: 18[19.5, 21, 22.5, 24, 25.5, 27]”
Length: 8.5[9, 10, 10.75, 11.5, 13, 14.5]”
MATERIALS
Rowan Felted Tweed [50% Merino wool, 25% Alpaca, 25% Viscose, 175 meters (191 yards) per 50g ball];
#164 Grey Mist (MC); 1[1, 2, 2, 2, 3, 3] balls
#167 Maritime (CC); 1[1, 1, 1, 1, 2, 2] balls
Recommended needle sizes
US #5/3.75mm 16 inch (40 cm) circular needle (2 sets) or longer needle if knitting using the magic loop technique and/or set of dpns for sleeves
NOTIONS
2 stitch markers
waste yarn
small crochet hook
4 large safety pins (optional)
.5 inch (13mm) buttons – 3
GAUGE
20 sts and 32 rows = 4 inches in St st
22 sts and 32 rows = 4 inches in Pattern st
PATTERN NOTES
This pullover is constructed by knitting the front and back lower edges separately and then joining them in the round to knit the body of the jumper. Faux seams are worked into the body once it is knit up to the underarm. The sleeves are knit separately up to the under arm, and again faux seams are worked before the sleeves are joined to the body at the yoke. The yoke (including the sleeves) is then knit back and forth, maintaining the color of each section with a separate ball of yarn. This gives a smooth join between the sleeves and the body of the jumper, and creates the plackets for the buttoned neck.
PATTERN STITCH
When working in rows
Row 1: Purl across.
Row 2: * C2F, k2; repeat from * across.
Row 3: Purl across.
Row 4: * K2, C2B; repeat from * across.
When working in rounds
Rnd 1: Knit around.
Rnd 2: * C2F, k2; repeat from * around.
Rnd 3: Knit around.
Rnd 4: * K2, C2B; repeat from * around.
Skills Required
Knitting in the round, cables, grafting underarms, knitting with more than one ball of yarn (though not intarsia or fair isle).
INSTRUCTIONS
Lower Edge
Cast on 48[52, 56, 60, 64, 68, 72] sts.
Rows 1-6: Knit across (Garter Stitch).
Row 7 (WS): K3, purl across to last 3 sts, k3.
Row 8 (RS): K4, * C2F, k2; repeat from * across to last 4 sts, k4.
Row 9: K3, purl across to last 3 sts, k3.
Row 10: K4, * k2, C2B; repeat from * across to last 4 sts, k4.
Rows 11-13: Repeat Rows 7-9.
Put the first lower edge on some waste yarn (or a spare needle) and then work a second lower edge the same way.
Tabbed Edges
Once you have both lower edges, join them together as follows.
Cast on 1 stitch with a back loop, then knit that st and follow Row 10 as before to the end of the first lower edge. Cast on another stitch at the end of the first lower edge, knit that st and follow Row 10 as before to maintain the pattern: 100[108, 116, 124, 132, 140, 148] sts.
Begin working in the round.
Rnd 1: Pm, p4, k42 [46, 50, 54, 58, 62, 66], p3, pm, p4, k42[46, 50, 54, 58, 62, 66], p3.
Rnd 2: K5, (C2F, k2) around to within 4 sts of marker, k9, (C2F, k2) around to last 4 sts, k4.
Rnd 3: P4, knit to within 3 sts of marker, p7, knit to last 3 sts, p3.
Rnd 4: K5, (k2, C2B) around to within 4 sts of marker, k9, (k2, C2F) around to last 4 sts, k4.
Rnd 5: P4, knit to within 3 sts of marker, p7, knit to last 3 sts, p3.
This ends the tabbed section. The pattern should now continue around the body apart from the two “seam sts” which come directly after each marker. These should always be knit and will become faux seams later.
 Body
Body
Rnd 1: * K1, (C2F, k2) around to marker; repeat from * once more.
Rnd 2: Knit around.
Rnd 3: K1, (k2, C2B) around to marker; repeat from * once more.
Rnd 4: Knit around.
Work even until the body measures 5.5[6, 6.5, 7, 7.5, 8.5, 9.5] inches from cast on edge, ending with Rnd 1 or Rnd 3.
You can now add in your faux seams for the st that comes directly after each marker. You can find a great tutorial about how to do this here.
Slip faux seam st and 3 sts on each side of it to a small scrap of waste yarn (7 sts on each side of garment), slip remaining front sts to longer scrap of waste yarn and remaining back sts to a second longer scrap of waste yarn. Get on with the sleeves!
SLEEVE (make 2)
First, if your contrasting color is one ball or less, split the ball into two equal balls. This is so that you can knit the yoke in the different colors at the same time. Use one of the balls for each sleeve.
Cast on 27[29, 31, 33, 35, 37, 37] sts and join in the round being careful not to twist. Pm before the first st.
Rnd 1: Purl around.
Rnd 2: Knit around.
Rnds 3 and 4: Repeat Rnds 1 and 2.
Rnd 5 (Increase rnd): K1, m1, knit around, m1: 29[31, 33, 35, 37, 39, 39] sts.
Continue to increase in same manner, every sixth rnd, 4[5, 6, 3, 5, 7, 9] times more, then increase every fourth rnd, 0[0, 0, 6, 4, 2, 0] times: 37[41, 45, 53, 55, 57, 57] sts.
Work even until Sleeve measures 6[6.5, 7, 7.5, 8, 8.5, 9.5] inches from cast on edge.
Add in a faux seam for the st that comes between the increases. Slip faux seam st and 3 sts on each side of it to a small scrap of waste yarn (7 sts), and slip remaining sts onto longer scrap of waste yarn.
YOKE
Setting up the Yoke
Note: It is easy to adapt this pattern so that you do not knit the yoke as one piece, but rather you finish the front and back of the body and both sleeves as four separate pieces that you can then sew together once completed. In this case it is still necessary to cast on 3 sts at the beginning of the front piece and at the end of the second sleeve for the button
plackets. The yoke decrease row has been written so that you can follow each section on its own, rather than working all four sections at the same time.
However, I would encourage you to try knitting them all at once, since it eliminates the need for seams, gives a wonderfully neat edge on the inside, and really isn’t as complicated as it looks, especially since you can use the sleeves to hold the yarns you aren’t currently using, so that they don’t get tangled up.
Before starting the yoke, split the ball of MC into 2 equal balls. One of these balls will knit the front part of the yoke body, and the other will knit the back.
With RS facing, slip sts onto circular needle in the following order: Front, Sleeve (ignoring 7 sts at underarm), Back, second Sleeve: 146[162, 184, 208, 220, 232, 240] sts.
Row 1: Beginning with the front and MC, cast on 3 sts (buttonhole placket) using the MC and then K those 3 stitches, and continue in established pattern across Front, with CC, knit across first Sleeve, with second ball of MC, work across Back in established pattern, with second ball of CC, knit across second Sleeve. Do not join the yoke in the round.
Note: When changing color, make sure to pick up the new color from underneath the color just completed to prevent holes in your work.
Row 2 (WS): With CC, cast on 3 sts at the end of the sleeve sts (button placket), k3, purl across to last 3 sts, changing color at each junction, k3.
Row 3 (Decrease row): K4, ssk, work in pattern to within 3 sts of sleeve, k2tog, k1; with CC k1, ssk, knit to within 3 sts of Back, k2tog, k1; with MC k1, ssk, work in pattern within 3 sts of sleeve, k2tog, k1; with CC k1, ssk, knit to within 3 sts of Front, k2tog, k1; with MC k1, ssk, work in pattern across to last 6 sts, k2tog, k4: 138[154, 176, 200, 212, 224, 232] sts.
Row 4: K3, purl across to last 3 sts, changing color at each junction, k3.
Repeat Rows 3 and 4, 1[1, 2, 2, 2, 3, 3] times: 130[146, 160, 186, 196, 200, 208] sts.
Buttonhole Row: K1, YO, k2tog, k1, ssk, work in pattern to within 3 sts of sleeve, k2tog, k1; with CC k1, ssk, knit to within 3 sts of Back, k2tog, k1; with MC k1, ssk, work in pattern within 3 sts of sleeve, k2tog, k1; with CC k1, ssk, knit to within 3 sts of Front, k2tog, k1; with MC k1, ssk, work in pattern across to last 6 sts, k2tog, k4: 122[138, 152, 178, 188, 192, 200] sts.
Repeat Row 4, then repeat Rows 3 and 4, 3[3, 4, 4, 5, 5, 6] times more: 98[114, 120, 146, 148, 152, 152] sts.
Repeat Buttonhole Row (second buttonhole), then repeat Row 4.
Repeat Rows 3 and 4, 3[3, 3, 4, 4, 5, 6] times more: 74[90, 96, 114, 116, 112, 104] sts.
Repeat Buttonhole Row (third buttonhole): 66[82, 88, 106, 108, 104, 96] sts.
Neck Edge
Rnd 1: Purl around, changing colors at each junction.
Rnd 2: Knit around, changing colors and decreasing as established at each junction.
Rnds 3 and 4: Repeat Rnds 1 and 2.
Bind off remaining sts loosely.
FINISHING
Graft the underarm stitches together. There is a great tutorial video showing how to do this here.
Weave in all ends, and sew buttons to the button placket opposite buttonholes.
Block your knitting and allow to dry.
Facebook Conversations