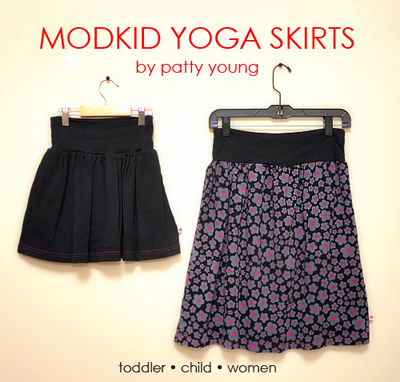
Yoga Skirt Tutorial (Toddler + Child + Women)
These sweet and comfy yoga skirts are a wardrobe staple at our house. They are easy to make, fun to wear and a great way to achieve that “Just Like Me” look for moms and daughters or big and little sisters. I have made these in any size from toddler to adult since there are no pattern pieces, just a quick and easy formula to follow… So come sew along with me and use up those awesome knit fabrics you’ve been waiting to sew with!
Suggested Fabrics: Use stretch knits only: cotton interlock, jerseys, matte jerseys, lightweight double knits, stretch velvet or stretch lace, 54” to 58” wide. For the waistband, you can use rib knits or any stretch fabric that has about a 50% stretch. See note at the end for a variation on this skirt using woven cottons.
ALL SEAM AND HEM ALLOWANCES ARE 1/2”
 The first thing to do is to determine your measurements. Use Figure 1 to determine your waist and skirt length. Using a tape measure, measure all around your waist (or the skirt recipient’s waist) and that number will be Measurement A. Next, measure from the hip area (just below the waist) to wherever you want the hem of the skirt to fall (mid-thigh, knee, below-the-knee, etc.) and that number will be Measurement B.
Next, using measurements A & B, we will determine the size of your skirt pattern pieces.
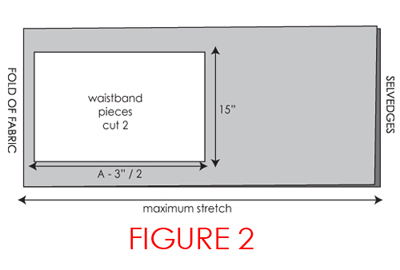
For the double-folded yoga waistband, take Measurement A, subtract 3 inches and divide this number by 2 to get the width of each of your 2 non-elastic waistband pieces (we make these pieces much narrower than the actual waist size because there is no elastic, so the band needs to be taut in order to hold up the weight of the skirt.) The height of each panel will be 15” for any size skirt. After all the pieces are sewn together, this will result in a 7″ band that can then be folded down in half to 3.5″, which is a perfect and comfy yoga band for all ages.
For example: My daughter’s waist measures 21” all around. So, 21” – 3” = 18” / 2 = 9”. I will cut 2 waistband panels at 9” wide by 15” tall with the maximum stretch of the fabric running across the 9” width. See Figure 2.
For the twirly skirt panel, we will take Measurement B and add 1 inch to it (1/2” for the seam allowance at the waist and another 1/2” for the hem allowance.) I normally cut my skirt panel the full width of the knit fabric for all skirt sizes… this results in a super full and twirly skirt for the little girls and a less-full, more fitted look for me. Adjust the width of this panel according to your preferred amount of fullness.
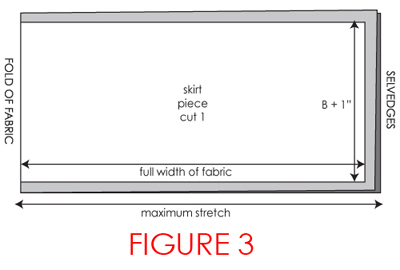
For example: My daughter likes her skirts to fall right above the knee. Her B measurement was 12”. So, 12” + 1” = 13”. I will cut her skirt panel at 13” high by the full width of the knit fabric, with the maximum stretch going widthwise. See Figure 3.
The last thing I do before sewing up my yoga skirt is to divide my skirt panel in two, widthwise. I do this because I prefer the look of two side seams on my skirts instead of one in the back. If you would rather have one skirt panel that seams in the back, you can certainly skip this step.
Now it’s time to assemble your yoga skirt.
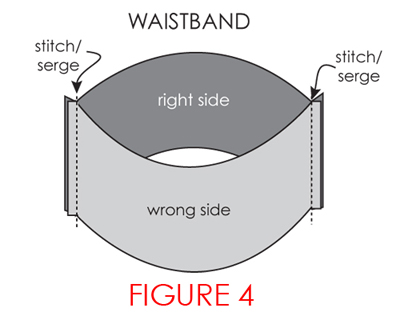
1. Create the waistband. Place one waistband piece over the other, right sides together, and stitch or serge along both side edges (the 15” sides) with a 1/2” seam allowance, thus creating a fabric circle, Figure 4.
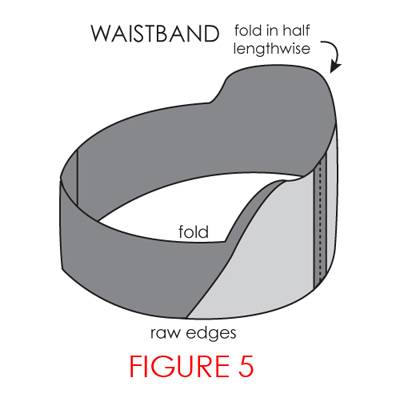
Then fold the waistband down in half, wrong sides together and press, creating a finished folded edge and two raw edges, as shown in Figure 5. Both side seams will be encased within the band, which is now exactly 7.5” high and about 4” narrower than your waist measurement. Set the waistband aside until we are ready to attach it to the skirt.
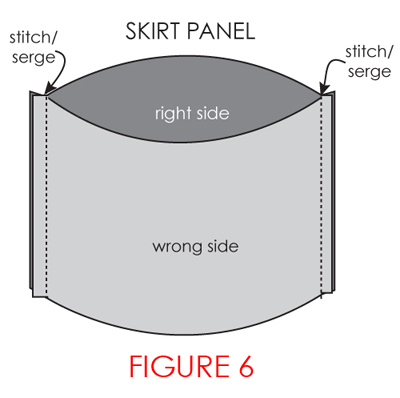
2. Create the skirt panels next. Lay one skirt panel over the other, right sides together and stitch or serge along both side edges with a 1/2” seam allowance, thus creating a fabric circle, Figure 6. Turn the skirt right sides out. Note: if you’ve chosen to use only 1 panel that seams in the back, then stitch or serge this back seam and turn skirt right side out.
3. Hem the lower edge of the yoga skirt using your preferred method. There are many ways to hem knits. My preferred methods include using a coverstitch machine for a more professional finish, or a lettuce-edge rolled hem on my overlock serger for a whimsical, fun look or simply by pressing up a 1/2” hem and running a zig-zag stitch on my sewing machine for a funky, home-made look.
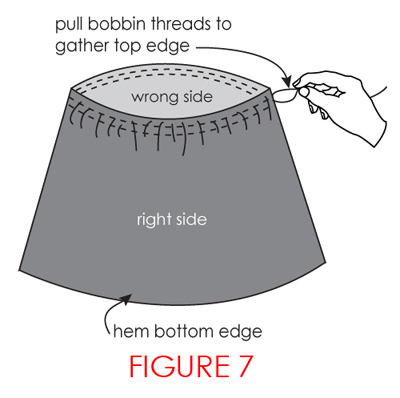
4. Gather the top edge of your skirt. Use your longest machine stitch and sew two rows of gathering stitches along the top raw edge of the skirt panel: one row 1/8” from the edge and the second row 1/4” from the edge. Don’t backstitch at the end! You want those threads loose so you can pull and gather. Grab both bobbin threads and carefully pull to gather the top edges of your skirt, distributing gathers evenly with your fingers. Gather the fabric until the skirt’s top edge is the same width as the waistband you created in step 1, Figure 7.
Note: If you have another preferred gathering method, like using a ruffler foot or your serger, you can do that instead.
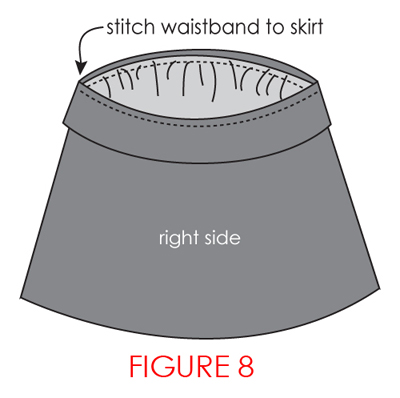
6. Attach waistband to skirt. Lay your waistband over the right side of the yoga skirt’s top gathered edge aligning side seams and keeping raw edges even. Pin in place all around, adjusting the skirt’s gathered edge to fit. Stitch or serge 1/2” from raw edges, Figure 8. Turn the waistband right side out and your MODKID Yoga Skirt is finished!
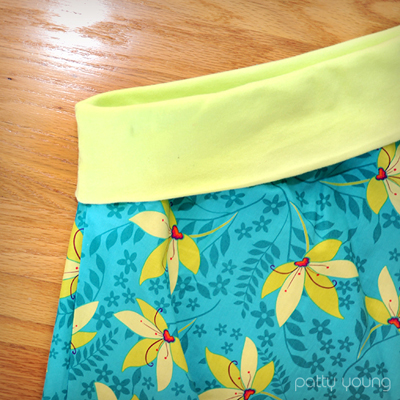
We usually wear our skirts so that the gathered area sits right above the hips and we fold the waistband down, to create that “double-fold yoga band” as you see above. Pregnant women can wear the full waistband panel stretched over their bellies for a super snugly and comfy fit.
Variation: You can make this skirt using a woven fabric like a quilting cotton, cotton lawn or voile for the main skirt panel, as long as you still use a stretch fabric for the double-folded waistband. The cutting and assembly instructions are the same, just keep in mind that quilting cottons are usually only 44” wide (not 58” like most knit fabrics) so the skirt will be less full and twirly. If you still seek maximum fullness, you can cut two full-width panels and assemble as directed. HAVE FUN!
Note: If you do decide to make the main skirt panel out of a woven fabric, it is helpful to gather the skirt a little wider than your waist (maybe even as wide as your hips) and then stretch the raw edges of your knit waistband to fit the gathered edge of the skirt when you attach it.
Regardless, it’s always a good idea to trim the gathered edge (or at least remove the gathering stitches with a seam ripper) before you wear it so that the skirt will have maximum stretch.
Always remember to use a stretch stitch or zig-zag stitch on your machine when sewing stretch garments if you don’t have a serger, to avoid broken stitches when the garment stretches over the body.
Facebook Conversations