How to Build a Raised Stone Water Feature Pond
I recently installed a water feature in my landscape. I had been planning it and thinking about it all winter, and I was worried that it would be too difficult or complex a project. I thought water features were mystical things that only professions could do, or that they were way too expensive. I was wrong, very wrong, this was easy, short, and relatively cheap to do.
I decided to do a raised water feature, for a few reasons. The main one is I wanted a focal point in the garden bed and a ground level one wouldn’t work for that. I also wanted to show off some stones, raised beds are safer for kids and critters, and with a raised bed you don’t have to worry about flooding sending all sorts of nasty junk into your pond from the surrounding garden.
In total I spent around $1200, but I bought some luxuries that were unneeded. Cutting those out the cost could be brought down to $900, or maybe even $750 if you did your own electrical work.
I spent around 3 days of work putting this together, though I did that work over 10 days as I did not have all my materials together when I started. This was a very much improvised project for me, I wasn’t using any plan I had found previously. So, if you had all the materials before hand, I would estimate you could do this in one three day weekend, or even a normal weekend if you had help.

Materials Needed
- 1 Preformed Pond Liner – I used a 150 gallon one
- 1 Pond pump, 1 pond filter, 1 pond fountain nozzle, 1 length pond tubing (sometimes all available together in a kit).
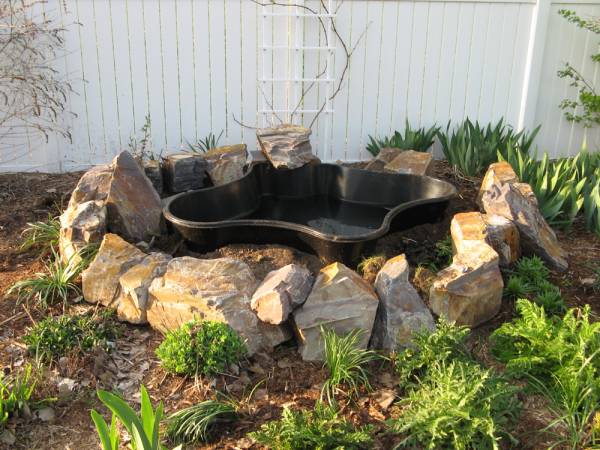
- Stones or bricks capable of providing a 12-18 inch high perimeter around the liner, leaving a 12 inch or so buffer for dirt between the outer edge of the liner at the stones.
- Dirt for backfilling (I used about 35 bags of topsoil)
- Thin set Mortar
- Waterfall Foam
- Plants
- Mulch
- Colorful Stones
- Fish, Snails, and other Live Critters
- Power Drill w/ masonry drillbit slightly larger than your pond tubing.
Step 1
The first thing that needs to be done is you need to pick an area for your water garden. Certain considerations need to be thought of. You will want to choose a level sight in full sun that is free from overhanging trees and has easy access (as easy as you can make it, just the further it is the higher your wiring cost) to the house for electrical connections.
Once you do that you’ll want to examine your liner and move it around the area until you like how it looks. Notice the liner (most liners) has two depths, a deep depth, and along the sides some areas of shallower depth, called shelves. Place the liner on the ground where you like it and using marking paint or flour mark out the outline of the deepest part only. This is where you must dig.
Step 2
Excavate the marked area to the depth of the shelves so that when the liner is placed in the hole the shelves rest flat on the undug ground. Make sure the bottom is packed firm, using packing sand if you wish, and make sure the liner is level. To check for level lay a flat board over the liner and put your level on the board.
At this point you’ll want to start adding water to the liner, you want to keep the pressure equalized on the liner as you surround it with dirt, so at this point backfill around the deep part, keeping the liner level as you work, make sure the dirt is packed in securely, and fill up the liner with water to the shelf level.
Step 3
You’ll want to put your stones around the liner leaving a foot or so of room between the outer edge of the liner and the stones. I choose a more expensive type of stone called Three Rivers Stone. This stone has really nice shades of purple, golden, and red streaking through it, which really appealed to me. It also has a blocky cut which made it ideal for turning into a wall. You can use any kind of stone really, rounded boulders, stacked fieldstone, bricks, whatever you like
Your wall doesn’t need to be perfect, unless you want it to be, you can leave cracks for ground cover plants to eventually cover if you like.
If you want to make a bubbling stone in your water feature, pick out a stone with a natural basin on one side (a bowl that’d hold water) or one that has a nice bit of coping or a slope for water to run down.
Step 4
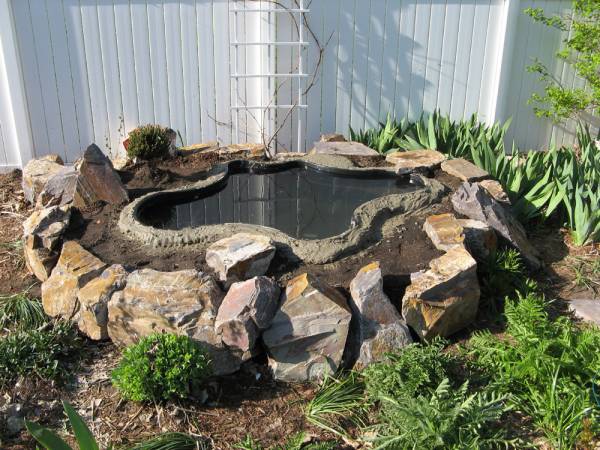
Once you’re happy with the stones, you can start backfilling with dirt and also filling up the rest of the pond with water, trying to keep the water and the dirt even in their progress. Be careful with getting dirt into the pond, if you get too much in you’ll need to clean it all out.
Be sure to tamp the dirt firm, and maybe even water it a little bit to help it settle. You’ll want to raise the dirt up to about a couple inches below the top of the pond liner. This would now be a reasonable stopping point for the day.
If you have extra stones, consider burying them halfway in the backfill dirt to make it look a little more natural.
Step 5
Mix up some of the mortar and build a rim by tucking the mortar under and up against the pond liner rim. What you’re doing is stabilizing the rim, and providing a dirt barrier (the last thing you want is a heavy rain to wash dirt into your pond), and creating a footing for your rim edging material. Go all the way around, it should end up looking as it does in my pictures. After the mortar has dried you can add more dirt now if you wish, but don’t go up as high as the rim and the mortar.
Step 6
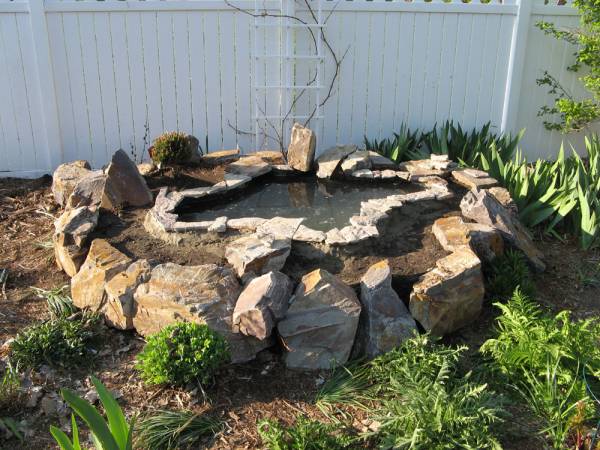
Now you can add your rim material. I got cheap broken thin fieldstone from the same place I got my larger boulders, I just individually picked out a bunch of matching scrap that sorta looked like my boulders, it was 15 cents a pound, so pretty cheap. I also had a couple of larger pieces of actual Three Rivers Flagstone that I used to break up the pattern.
You can attach the rim material with another layer of mortar, but honestly, it didn’t work well for me. I got so much wet mortar in the pond, it was a mess. Many of the pieces did not adhere well, so instead, I went back and attached those with waterfall foam, and that worked much better. Waterfall foam is just like polyurethane expanding insulation foam you can get at any hardware store, except it is black in color. It expands greatly and provides a dark, firm, and waterproof seal.
Lay down a thin line of foam and place your stones. Let it dry, don’t worry about the bulges sticking out the sides. When it is fully dry (a couple hours) go back and cut the bulges off with a knife, they’ll come off easily.
When installing the rim be sure to leave a channel in the back for a discrete exit for the pump power cord, as well as the pond tubing, if you’re using it.
Step 7, install the optional bubbling stone waterfall
This part isn’t required, you could just have a fountain and be happy, but I wanted a bubbling stone as well.
The first step is to take your stone you picked out earlier and using a water bottle pour water over it and make sure it flows like you want it to, if not you may need to tilt it and or place it differently. Once you’re satisfied you can drill it. My tubing was 3/8 inch so I got a ½ inch drill bit. My stone was about a foot thick and it took around 20 minutes of drilling to get through, don’t apply too much pressure, just go slow and steady. I more or less just leaned my body weight on the drill.
Now you’ll need to find a base for your stone. I got two narrow pieces of Three Rivers Flagstone that matched my boulders. These flag stones were about 4 inches thick, so they provided plenty of height. I then used a large amount of mortar to provide a large base for them (I did this of course back when I was mortaring the rim of the pond liner). I ran the mortar straight from the rim of the liner back to the nearest stone, and put it on thick. Then I planted the two flagstones in the wet mortar, leaving a crack of about 2 cm between them, and having them jut out over the water for about a third of their length.
The next day once the mortar had dried I attached my tubing to the pump and ran it up through the crack between the flag stones and through the drilled hole in my waterfall stone, then I placed the stone on the flag stones and maneuver it so the tube wasn’t being pinched anywhere by the weight (the stone was probably around 80 pounds). I had to wedge a smaller stone in the back of my drilled stone to get the incline I wanted, but that was it. I turned on the fountain and the stone bubbled, the water ran down the front of it, and dripped into the pool.
Step 8
Now you can plant the area around your garden. I choose to use a variety of low growing sedum ground covers with coloring (purple) that matched my stones. Eventually these sedum will cascade over the rocks in a very nice affect.
I also planted accent plants in the form of dwarf evergreens. Most of them were $10 each, but one, a dwarf Mugo pine called Teeny that was probably 10 years old or more (they grow so slow) was around $80. My overall goal with the look was to create a miniature alpine garden as if the stones were mountains and the evergreens were full sized trees.
Step 9
You’re almost done, just add much to cover up any visible mortar you can see. Pay the electrician you hired to run a box out to the back of your garden. Install the fountain head you want and otherwise clean up the area.
One thing I did was go back and in a few of the cracks between the stones I added waterfall foam to help seal those up. Then of course I went back later and cut off the bulges.
Also, if you got the interior of your pond dirty, you should clean it. I used my wet vac to vacuum and drain the entire thing, it took 30 minutes and 10 loads of my 16 gallon wet vac, but I wanted to start my pond off right, and that meant clean.
Finally, I got some decorative blue gravel from the pet/aquarium shop to cover the bottom with, it makes the water look bluer on sunny days, and certainly is nicer than the black of the liner. Gravel is also important if you want to support wildlife.
Step 10, Optional Plant and Animal Life
If you want to get plants and animals in your garden (and you should, else it’ll just be a haven for mosquito breeding) the first thing you need to do is get pond test strips to test the water, you can get these usually where you got your pump and everything else at. Make sure the readings are okay and then you can add critters and plants.
You could just add water lilies, which are beautiful and can be hardy to zone 3 if you get the hardy varieties. If you plan on supporting fish though you should also get some more weed-like plants that both clean and oxygenate the water, as well as provide food for the fish. The place where you buy your fish can recommend some to you.
On the topic of fish, I’m sure we all think koi, but koi are expensive and if you’re like me your pond garden is only 150 gallons, not enough room for koi. Better to go with Koi’s smaller cousin, the gold fish. Specifically “comet” or “feeder” gold fish, they look like koi, and are really, really, cheap, 26 cents each the ones I bought. I was going to get more expensive larger ones, but the fish guy explained they grow so fast that these gold fish will be up to 6 inches or longer within a couple months. This way too, if a couple die, no big loss.
Of course, fish produce waste, and also people overfeed fish which produces rotting fishfood on the bottom, so, to help keep your pond’s ecosystem intact, buy some trapdoor snails to help eat all that junk up. Check the Internet for those.
Finally, tadpoles might also be a fun addition, they also eat bugs and mosquito larvae, and they’re interesting for kids.
Finally, at the pond store you’ll probably see a salt or mineral treatment for your water, get some of that too, it doesn’t make it like ocean water, but it does make a better environment for the fish and inhibit algae growth.
Wrap Up
In total, here is what I spent:
- $500 – stones, including delivery
- $50 – dirt and mortar
- $250 – electrical work
- $200 – pond liner, pump, filter, tubing, fountain, etc
- $200 – plants, mostly just that one dwarf pine though
- $20 – fish, snails, tadpoles
I couldn’t be more pleased with the end result. This garden bed has long lacked a focal point, and now it has one. I didn’t know how it’d work out when I started, but it exceeded my wildest expectations.
Facebook Conversations